I turn 22 next month, so I've decided that for the next month I will complete a list with 21 things to do.z
Paint a new painting
Visit Art Galleries
Bondi to Coogee Walk
Study my butt off
Party
Sleep more
Gym and healthy food
New sketches
Book snowboarding trip
Watch old school hollywood movies I have never seen
Bake and try some new recipes from the book I got from Christmas
Try the new Anzac biscuit recipe my friend gave me
Print some photo collages for my room from memories of the last 4 years
Buy new clothes and shoes
Set a date for horseriding in the valley
Dye my hair and get a haircut
Skype M because its been way too long since we've caught up
New music, buy some old movies and tv shows.
Go to a heated pool, with a sauna, steam room and a spa
Get a massage
Get my nails done.
So, the next year is going to be full on. I have full time work at the firm, I am a tutor after work on Wednesday nights after the office and I occasionally do the random modelling job every now and then. On top of all that I'm doing my degree - the last 5 units. To keep on top of this I need a plan: That plan being, exercise, eat healthy, budget, and sleep more and occasionally let loose and party.
I seriously need to sleep more, I know it sounds ridiculous but I am going to have to make a bedtime and sleep at that time.
Gym and my diet have been going really well, I go to the gym everyday and do a series of cardio on the cross training and on the rowing machine, with yoga classes and core fitness classes, I feel stronger healthier and that I have more energy. I will book a snowboarding trip before the end of the season.
I've started to watch old hollywood movies, and I think I might educate myself in watching a whole bunch of them they are great. I just saw Breakfast at Tiffany's. There's something about these movies that make them so magical, and the dialogue is so clever.
For the next year, till next June its all going to be about fitness, work and study I mean Id love to go for a trip overseas but I am going to put that off till next year, I really want to get on top of these things and buy a car and get a new apartment and figure out where I want to live in Sydney. Graduating is a top priority and I am going to have to try to stay as focussed as I can and it won't be easy. Though I am going to wear that grad robe soon I hope!
Hey everyone! Just a quick post. So Victoria Secret X is putting together these great workouts. Take a look and I'll post the rest here also when they come out! Enjoy! xx ~M
Hey everyone, so since summer time is coming here in sunny California and all us "California Gurls" are getting ready for trips to the beach! I'm planning on doing a whole series of posts based around this theme (series in this sense means at least 3 posts that I've already planned). So the first is waxing!!
I've always been scared to wax, whether getting it done in a salon or doing it myself. For several months now I've been considering buying myself a wax kit so I could do it at home and for a cheaper price. So when Sally's deal on their Suddenly Smooth waxing items I thought why not. Unfortunately, I don't believe it is still going on but keep an eye out if you are interested because I know they've had great deals on their GiGi waxing stuff in the last also, which according to reviews is also very good.
UPDATE: So I just checked sallybeauty.com and they are having a sale on their GiGi waxing items! Check it out HERE. You get the warmer, informational CD, one 14oz pot of natural wax, 100 large natural muslin strip all for $29.99. Just note, this isn't the brand I got so don't expect the same results to apply.
So I did my legs about a week ago using the Argan Oil infused wax and it worked great! This wax is good for your legs because you can deal with larger areas more easily without worrying about it drying too fast and it can get rid of thicker tougher hairs. Aloe Vera wax is perfect for facial waxing, it soothes and works well with the finer hairs. The Deluxe Cream Wax is good for bikini waxing and underarms because it deals best with the thicker curly hairs.
I had a really good experience especially for it being the first time waxing it actually wasn't as painful as I thought it would be. I'll just go through the basic steps I took to wax my legs...
The reason I decided to wax my legs is that's get ingrown hairs and razor bumps super easily and I was so sick of it. So far, this method seems so much better!
1. Warm up your pot of wax on about temperature setting "5" until the wax has melted through to the center. I used one of the applicator sticks to stir it around every 15 minutes or so. It takes a while so plan ahead when you'll get time enough to do it. When it was melted through I turned the temperature setting it to around "3" or "4."
2. Apply the numbing/ antiseptic to your leg. I did one leg at a time. And add a light sprinkling of baby powder after. This will get the wax to stick better to your hair and not your skin making it a less painful experience.
3. Using the applicator at an angle against your leg, run a thin layer of wax along your leg in a smooth stroke in the DIRECTION OF HAIR GROWTH. That is super important! Do each section at a time, making the waxed area no bigger than your fabric strip.
4. Take one waxing strip and lay in onto the wax on your leg also in the DIRECTION OF HAIR GROWTH. Rubbing firmly to press the fabric down in ONLY the direction of hair growth. Don't rub back and forth.
5. Holding skin tight at the bottom of the strip, pull back on the strip in the direction AWAY FROM HAIR GROWTH.
6. Once you have completed the whole leg, use the wax removing oil to help get of the excess wax and the stickiness. Once you've done that, use the soothing aloe vera or something similar to stop the redness and soothe your skin. If you are going to use a moisturizing lotion pick one with no alcohol, paraben or fragrance. You want something really gentle.
And ta-da! Your skin should be silky smooth!
Mine has been waxed for over a week now and no hair growth yet! I'll update in my next summer series post if you're interested. It should last you at least around a month of nice smooth hair free legs. And here's even better news! If you wax consistently and don't shave at all anymore, it will get less painful the more you do it, the hairs will become thinner the more you do it AND will stay away longer.
Hope this helped! I know it's a tricky decision for a lot of you gals out there, it was for me.. But now I'm so glad I tried it!
Working full time and studying isn't as easy as it sounds. Yet doing these two things at the same time, is very rewarding.
The thing with doing this is that it can be very difficult, so here are a few of my key points which I utilise to make things easier for myself.
1. Make room for play! See you friends, take short adventures, go snowboarding etc. Its vital that you make room to have fun between work and study because it revitalises you in order to keep focused. If you feel rejuvenated you're more likely to have a better attitude towards work and study.
2. Back up all of your assignments everywhere! I'm talking on a USB, on your computer on a second USB and in your email account. The worst thing is losing all the work you put in, especially when your are also working full time.
3. Set goals, and reward yourself once you reach them - this works well as it becomes a self motivating habit. An example would be after the Semester take a weeks vacation to somewhere you've always wanted to go in order to reward yourself for working so hard during the Semester.
4. Keep in touch with your uni friends, networking is great especially once you graduate, also its helpful when you can discuss the topics in the unit, or ideas for assessment etc. It also makes you less likely to skip classes if you are meeting up with friends on campus and makes for great study sessions.
5. The most key aspect is to have REALLY GOOD TIME MANAGEMENT. This is so important. Time does equal money, except we are all guilty of wasting time. I try to schedule everything important I have to do in advance in a small planner, such as appointments, work, important dates, catching up with friends and family, basically when it comes to anything - the key thing is don't waste too much time planning it. Just do it! No thinking about it, if you need to get something done just think less about planning to do it and just get out there and get it finished. I always keep a to do list, and i get those crossed off ASAP, once that list is done I add on or write up a new list. It's pretty much never ending, but it keeps you busy.
I keep a bunch of separate lists, in a 4 section notepad, I allocate a section to things I need to get done. The sections include:
1. To Do List - ASAP, things that are TOP PRIORITY: these need to be urgently completed at the earliest convenience.
2. Work: things I need to study for work (which is separate for uni) this includes seminars, reading, career orientated stuff, my modelling stuff, I also put fitness in here as well as I work for an agency keeping fit is part of the job too.
3. University and Study: This is where I keep a bunch of my notes on completion of study and my degree, units I have completed and units i need to complete and where this study can take me.
4. Adventures: This is the fun one! Its all the places I want to travel, short trips I want to take and just whatever pops into my mind that I think hey, that would be amazing!
In conclusion try to make a BALANCE - its important, don't just work and study remember to have adventures! Don't burry yourself in work and forget to have fun with the people that are important to you.
I had such a fun day of baking and cooking. You can find the dinner meal I made tonight HERE, Filipino Bistek. Now time for the dessert or afternoon tea. These were originally cupcakes with frosting but to make them a little healthier I cut out the frosting and called them muffins. They are adapted from one of my all time favorite cookies/cupcake/muffins cookbook that I share with you bellow. I HIGHLY recommend it if you enjoy baking :) Anyhow! Here we go...
Ingredients
1 2/3 cups all-purpose flour
1 1/4 teaspoon baking powder
1/4 teaspoon baking soda
2 ripe bananas
8 tablespoons of butter, softened
heaping 1/2 cup of superfine sugar
1/2 teaspoon vanilla
2 eggs
4 tablespoons yogurt
3 oz/85 g of semi-sweet chocolate chips
Directions
1. Heat oven to 375F/190C.
2. Sift flour, baking powder, baking soda. ALWAYS SIFT, don't skip sifting EVER. It makes your cakes SO much more light and fluffy, especially if you don't have an electric mixer.
3. In a separate bowl, use a fork to mash up the bananas into a pulp.
4. In a large bowl (I used the electric mixer bowl at this point), cream together the butter, sugar and vanilla extract until light and fluffy.
5. Beat in eggs to that mixture one at a time. Be sure to beat thoroughly.
6. Stir in mashed bananas and yogurt.
7. Fold (this would be the slowest setting on a KitchenAid mixer or the 'Stir' setting) in the dry ingredients and chocolate chips.
Distribute into 12 lined cupcake liners.
Bake for 25 minutes or until risen and golden. Know your oven, they are all different.
I love this dish, it has to be one of my all time favorite Filipino dishes. Although this didn't turn out to be as good as the one my boyfriend's mom makes, it still had that same simple but Delicious flavor. Plus it is amazingly easy to make! Enjoy!
Ingredients
1 pound sirloin steak, cut into thin pieces
1 1/2 tablespoons lime juice
2 tablespoons soy sauce
1/4 teaspoon freshly ground pepper
Sprinkle of salt
1 red onion, cut into rings
cooking oil
Directions
1. Marinate meat in lime juice, soy sauce, pepper and salt.
2. Using a generous amount of oil, cook onion rings until transparent and soft. Transfer to a serving dish.
3. Cook meat in the same skillet, on high heat, stirring often, until browned and tender.
4. Add lime juice or salt to taste if desired.
5. Add onions back into the skillet, cook for another two minutes.
This is such a simple delicious light cake that it SO easy to make!
Ingredients:
Cake:
3 cups of flour
1 teaspoon baking powder
1/2 teaspoon baking soda
1 1/8 cup salted butter, softened (if you are using unsalted butter go ahead and add a teaspoon of salt..I always use salted so I NEVER add salt by itself)
1 3/4 granulated sugar
2 teaspoons pure vanilla extract
4 eggs
1/4 teaspoon pure lemon extract
1 cup yogurt
Glaze:
1/2 cup milk
1 teaspoon vanilla extract
About 3 cups powdered sugar
Oven & Special Equipment:
Bundt pan
Set to 350F, rack in the middle.
Instructions:
Pre: butter Bundt pan thoroughly and toss flour into it making sure it is coated. Tap the rest of the flour out of the pan so you have a thin coating.
1. Sift together flour, baking powder and baking soda. Set aside.
2. Cream together granulated sugar and butter in an electric mixer until light and cream colored. Lots of "air" inside. I beat it on a high speed for a couple minutes.
3. Add vanilla extract for the cake into wet mixture and mix thoroughly.
4. Add eggs, one at a time, and mix thoroughly.
5. Add lemon extract and mix thoroughly.
6. Now grab that dry ingredient mixture you set aside and alternate with the yogurt mixing into the wet ingredients.
7. Spoon into the Bundt pan and spread evenly. Cook for about 50 minutes. You have to know your oven. I cooked mine for 30 minutes at 350 and the last 20 at 250 and it came out PERFECTLY.
8. While it's cooking, pour milk and vanilla extract for the glaze into your electric mixer's bowl. Let sit while caking is cooking.
9. While cake is cooling, add in the powdered sugar to the glaze mix until you get you desired consistency. It wants to be runny enough to dribble over the cake but not too runny that it runs right off.
Enjoy!!
Hey everyone! So another goal for my spring break is getting some more cooking experience! Particularly a couple of my favorite Filipino dishes! I will be uploading the recipes as I go, but first I though I'd share something to make your meal planning easier.
As I said before, I use Pepperplate.com (read my post about this great tool HERE) and I still do. But there is something missing. I like to be able to flip through my recipe books and drool at all the goodies, have something tangible in front of me, and something I can jot down my plans on without having to sit in front of a screen also.
Since I don't live by myself I am not always the one cooking, but even so, I'm a big fan of planning and organization so I like to think out my cooking best I don't have to rush out and get some groceries.
I am going to share with you a super simple way to take a little stress and hassle out of your life to enjoy cooking more! HERE is free printable for you that you can put to use (or not) if you would like.
Also a glimpse of my planned cooking for this week: Vanilla Bean Lemon Bundt Cake Filipino Sirloin Steak (Bistek)
Pancit Miki (Noodles with Bean Sprouts)
Twice Baked Bacon Deviled Potatoes
I will link each recipe to its post as soon as it's up!!
Have a delicious week! Xoxo
~M
I am super excited to share this with you all. It is the first Sunday of my spring break and already I have accomplished one of my "goals" for this week! So let's get started so you all can have a chance at it too! First...the materials you will need.
- 2 foam boards (bought 3 as pictured here but didn't use one), 1.95 each
- hot glue gun, 3.99
- hot glue gun glue sticks, 3.99 for a pack of 18 (I only ended up using 6)
- Stanley knife
- pencil
- ruler
- a few nail polishes to use as measuring tools
Let's get started!
First you want to determine how big of a shelf you want to make, I decided to cut one board in half and use that as the back board of the shelf. A whole board just seemed to big and I'd rather have two small shelves than one really obtrusive one, but it's all up to you. My measurements are going to be for a 20 by 15 inch board.
Just to get an idea for the size, mark halfway across the width of the board and line up your nail polishes to see if they fit nicely into that space.
I was really pleased, halfway across the board looked nice and proportional and it perfectly fit 13 nail polishes.
Now it's time to start measuring. I took pictures of all the lines I drew but they didn't come up on camera too well so I'm not going to put all of them up.
Just one tip to start, always have the ruler pressed against a flat pre-cut edge of the board to ensure your lines are straight. As pictured bellow. I used my own line here, but for even more accurate measuring use the edge of the board.
Draw a straight line up the middle of the first board, as pictured above. Since we know the board is 20 in vertically, I decided to have shelves spaced 4 inches apart, making it nice and even. Take a quick measurement of your tallest polish to make sure it will fit, most if not all will fit in these shelves.
Now we've got our spacing, go ahead and draw the 4 lines for where your shelves will be placed, plus on on the bottom and one on the top.
I used the first board to also measure out the long sides of my shelf. I decided to have the shelves and the sides 3 inches in width. Go ahead and measure out 2 20 by 3 inch strips on that first board.
On the second board, measure out 6 15 by 3 inch strips for the actual shelves the polish will be sitting on.
Time to cut them all out. Be careful when using the knife, it is extremely sharp and has to be to get a nice cut edge, or else the foam will be jagged. Make sure you are using a fresh blade.
Use a ruler to help guide the blade, like so, hold the ruler real tight, and always you have something under where you are cutting that you don't mind getting cut up.
Now you have all your pieces. Should look something like this:
Time to get out the glue gun and start gluing away! You have to work fast because glue gun glue dries super fast. Start with the edges, they will help guide your shelves later on to make sure they are straight.
Next the shelves, from bottom to top or top to bottom. I lined the sides with glue and then went back when they were all in and reinforced the bottom, top and sides of all the shelves. Nail polish gets heavy so it's better to use more glue than less. Use your fingers to get rid of all the whispy glue threads. You final product will look something like this:
I hope you guys enjoyed this and that it has inspired you to go out and make something of your own! Making things yourself is often a lot cheaper and much more fun and rewarding! This is such an easy project, it took me no more than a couple hours max. It's spring cleaning time of the year and nothing can be better than cleaning out some clutter and displaying it nicely!!
Hey everyone,
Just a quick post in between the items on my to-do list, mostly consisting on homework. I came across this video from the Youtube beauty guru JLovesMac1 and thought I'd share it with all of you since the summer is coming. I have a varied opinion on the video but it's always good to share and discuss each others health habits and tips. The more you listen and explore, the more you learn and grow! Enjoy! I'd love to hear all your comments as always! <3
I have a few friends who have found it difficult after graduating university to get that job they want. There is three key tips I have used, make sure you have a resume and cover letters ready too.
1. Look online and apply directly in person or via email.
2. Enquire at establishments near your area.
3. Use a recruitment agency
This means that you are doing everything possible to get the job that you want by covering all three aspects.
I came up with this idea which is so simple for decorating the walls of your bathroom. All you will need:
- blue acrylic paint
- white acrylic paint
- a paint brush
- assortment of shells
- wood/pva glue
- small square canvases
All I did was paint the small square canvases with blue pain mixed with white to make it lighter, really you could use any colour you like. Then after the pain had dried I glued the shells onto the canvas allowed them to dry and placed removal hooks onto the walls in the bathroom. Then I just put them up on the wall. The photo above is how they turned out. They definitely brighten up my ensuite bathroom.
Hi! So I thought that this would be an important topic, as everyone is going to have to do this at least once in their life. I had to leave a workplace a while ago as I was moving states. So I thought that it would be great if I did a short post on it!
People quit jobs for all sorts of reasons. Generally it is a common courtesy to give an employer two weeks notice when quitting a job. Most people would suggest that without giving notice you are burning bridges.
Why do people quit their jobs?
They have done everything possibly to make their current job work.
The business is experiencing loss of money, customers and there are rumours of possibly bankruptcy.
The relationship between employee and employer is irrecoverably damaged.
Life situation has changed and benefits no longer suit life needs.
Moving on to better opportunities to support their lifestyle.
Their values are at odds with corporate culture - a lack of congruence with corporate culture will destroy their attitude at work.
They have stopped enjoying their job and dread to go to work in the morning.
The company has ethics out of sync.
Their stress levels are so high at work that it is affecting their physical and mental health.
They become unchallenged and need more responsibility so they seek other opportunities as they have already explored the current and potential options and they are limited.
Quitting:
Make sure that you are making the right choice.
Get your facts straight for why you are quitting.
Write a formal resignation letter. Keep the letter positive and thank them for the opportunity.
Speak to your supervisor, be prepared that they may attempt to try and make you stay at the establishment. This is why you should be clear in why you want to leave.
Stay for your notice period outlined in your workplace contract do not leave your current job without doing this, as it leaves the business in a tough spot and will give them time to replace. Make sure to be diligent and committed until the last day.
Here is an example of a resignation letter
Your name
Address Line 1
Address Line 2
Suburb, State, Post Code
Insert Date Here
Official person of notification
Name of establishment
Address line 1
Suburb, State, Post Code
Dear establishment/person,
Please accept this letter as a formal notification of my resignation at (business establishment) as I have been offered a job at another company with more scope and opportunities. It is with great sadness that I leave a role with such a fantastic team and environment. I have enjoyed the (how long you worked for) and have learned more about the industry.
As per my employment contract I am giving (amount of notice) and my last day of work will end on the (insert date).
I would like to thank the rest of the staff for their acceptance and support in my role.
Yours sincerely,
.............................
Peter Pan
**********
It is very tempting to just blow off your current job for an amazing new prospects. Yet it is important to remain professional. You may never know when you may need a reference from a former boss or when you may end up working with former co-workers. By quitting a job as gracefully as possibly it will be more likely that more options will be open to you in the future.
Hi everyone! With the upcoming spring (here in the northern hemisphere at least) I thought I should share some of my favorite healthy and yummy snacks for a new spring cleanse. I tried to chose a variety of types of snacks so that all of you would find a couple you would like to taste!
1. Homemade fruit granola yogurt parfait: Easy and well known. Your favorite PLAIN yogurt, not sweetened with dried apricots, frozen berries or fresh strawberries (my favorites) and a simple granola mix.
I used THIS granola bar recipe the other day and broke the bars up after cooking them and put it with yogurt. Everyone loved it, the yogurt takes away from the sweetness.
2. German whole wheat farm bread with melted Jarlsberg cheese and pastrami: very "earthy" solid bread with the mild cheese goes perfectly with the subtle taste of roasted smoked beef. Also works well with canadian bacon which is not fatty at all, more like ham. I like to fry it first (no oil) and then add it to the sandwich.
3. Frozen fruit smoothie: I always grab a bag of mixed frozen berries from Costco. They are perfect for desert toppings as well as a summer smoothie. Blend the berries, yogurt, milk, banana and I like to add some vanilla ice cream and vanilla extract (only a drop or two of extract--it's strong!). You will love this after a long sweaty days work or walking around your school campus on those sunny days.
4. Fruit fruit fruit: the simplest snack and probably one of my favorite. I LOVE fruit! And if you do too (even if you don't) there are a couple things you can add to your daily fruit diet to spice it up a bit. Every morning I have grapefruit with a sprinkle of sugar, peeled pomellos are also delish with a touch of sugar. If you're more of a spice girl, sliced banana and apple with a slight sprinkle of cinnamon is also great (not too much though, just a very very light dusting-especially for those of you that are acne prone like me). I find that clementines (aka Cuties for my US readers-I know we all love their stickers, and the fruit is tasty too!) and oranges go great with shredded unsweetened coconut. Mangos are amazing too and they don't need anything added! Though some of my friends love mango thats a little unripe with salt and pepper...umm not sure about it but try if you want.
5. Cottage cheese with tinned lite peaches: simple light snack and very healthy. I like to drain the syrup that the canned peaches are preserved in and make sure you get the "Lite syrup" version too!
6. Omelets: a couple eggs with some veggies and cheese is always a good breakfast or light lunch. Hard boiled eggs are good too, on salad!
7. Summer salad: my favorite simple summer salad is super easy to toss together. The basic greens including lots of baby spinach leaves. Add a dried fruit (I usually use dried cranberries, but sour apricots and blueberries work great too). Last but not least, slivered almonds. Almonds are super good for you and great in any salad.
8. Greek yogurt: this has been "in" for a while now and I finally picked some up at our local Trader Joe's, of course being me I got the whole fat one, I know, but there is also 2% and 0% available which I might try next. I've already finished one container and just got a second! Super yummy and creamy, the most creamy yogurt I've ever had! I just have a small bowl each day.
9. Toast with fruit butters: another amazing thing from Trader Joe's are their fruit butters. They have fig, honey apple, apple cranberry (my favorite and I can't find it anymore!! :( ), mango, pumpkin and I'm sure there a a few more I don't know about. But anyway, why butters? So I read that butters have more fruit than they do sugar unlike jams and Kelly's which are least much all sugar. I know the Trader Joe's ones have twice as much fruit as sugar which I love and it makes it so much more flavorful.
10. Frozen veggies: this is a great way to get in veggies to your diet. I like getting the mixes with broccoli, peas, corn etc just the usual, then I usually choose a more "exotic" (not really) like grilled asparagus. Frozen spinach is always in freezer, great to add into so many good recipes.
Yay! So that is all..hope you got some ideas from this list. Have fun and eat well!!
Xoxo
~M
PS: I will add pictures as I make the above this spring!
Really taste recipe I tried out the other day. It was too sweet to eat on it's own but with yogurt was delish!
Ingredients: 2 2/3 cups rolled oats (I used granola because I didn't have rolled oats, I think the oats would actually work better and I have bought some so I'll update this post and let you know! :) 3/4 cup dried chopped apricots 3/4 cup butter 1/4 cup honey 1/2 cup brown sugar
Preheat oven to 350F
Directions: 1. In a small sauce pan mix butter with brown sugar and honey until combined and melted. 2. Add apricots and granola and mix. 3. Spoon into a lightly greased 8in by 8in baking pan. I also like cutting a piece of parchment paper to fit into the bottom of the pan so your cake or granola doesn't stick. 4. Cook in oven for 20-25 minutes. 5. Cool in pan cut and serve. Yum!
Hello lovely readers, it has been too long. Sometimes in life we have those weeks that as hard as you might try you just can not squeeze anymore into them even if you wanted too. Yes. That is my excuse for not blogging. Inadequate I know.
How was everyone's Valentine's Day? I'd love to hear about what fun times you all had! Comment below! I found out this year that it is the favorite "holiday" of a bunch of people I know! It kind of surprised me, but I got to thinking...why not? Showing your love and appreciate to those you care for whether your boyfriend/fiancé/husband, family or friends is important! Although, I hope we can all work to do that on every day oftener, not just one day out of 365.
I myself had a little surprise or two..or three. Although my live couldn't be with me he sent a sweet letter and waiting for me after getting home from work were a dozen red roses in a vase! :) how lucky I am. My dad got me an iPad! Out of the blue right? I am loving it, just like V is loving her Mac I know :). That means I can blog to all of you from anywhere!
I wish I could say all these cookies I have made with all of you. But unfortunately I can only virtually give them to you all :) Enjoy!
I was recently speaking to a friend, and we found in some scholarly articles that University students have one of the highest suicidal risks in society.
When we found this information, I realised that most of my friends have become depressed at some point while studying in university. I even was told by a friend who saw their friend at college standing on top of her railing planning on jumping off the balcony as they felt as though they couldn't cope with university, luckily this person got the help they needed and has a better handle on things.
The pressures of university, have all got to all of us. Or life changing events can have a huge impact. The thing is, is that sometimes you can't handle everything yourself, and confiding or getting help is the best thing. It's better to get help, or help another person you know get the help they need.
The thing is painful conditions always pass, whether they be mental or physical. One of the worst things you can do is take drugs and alcohol to numb the pain. If you look at it from this perspective, you would never advise a friend to take their life because of their problems.
A short list of things you can do, or advise a friend to do (beyond blue website):
Seek information: There are lots of information on depression, anxiety, postnatal depression and other documents, it is good to develop an understanding on what you or your friend have been feeling or the symptoms.
Talk to a health professional in person or over the phone, there are many helplines which you can contact. Some treatments can include counselling services or in some cases medical treatment may be needed.
Eating well and exercising will help immensely. Exercise stimulates endorphins and will make anyone feel better.
Get into nature - a walk on the beach, a horsehide, walking the dog can improve your mood.
Write down or blog your feelings, meet a friend for coffee.
Take time out to relax, do yoga, read, do a painting.
Stay away from drugs and alcohol they are depressants.
There is so much information on the internet, and so many helplines. There is so much help and resources out there, so if it is yourself or someone you know you can acquire the help you need.
Some Australia helplines I found on google included:
So I had the not so happy experience of an ingrown toenail these past few weeks. I have had it before, at least three years ago now and was able to cure it by a really easy home remedy my doctor told me to try. And I mean REALLY easy. I have found that lots of people experience this and many go through surgery without trying home remedies themselves first so I decided to post this. You never know, might come in handy.
Ingrown toenails almost always occur on the big toe. There are a few things that can cause it and these should definitely be things you should avoid when feel your toe start aching. Here are a few things you can do to cure and releave some pain.
Don't were tight or heeled shoes. If you can wear open toe shoes to allow your skin to breathe and not be packed tight inside a shoe. (Unfortunately for me this was not possible walking around campus all day and then in tight fitting ice skates the next. Ouch)
Soak your toe in HOT water, the hottest water you can bear, the warmer the better. This not only helps kill bacteria and keep it clean but helps bring any infection or puss (I know really gross.) to the surface and eventually releases. I read you should soak for at least 20 minutes every day.
After soaking feel free to rub on some antibacterial cream to the toe.
If you can, put some gauze roll in between the toe nail and skin, if it is the corner of your toenail digging into the skin this shouldn't be too bad to do. If it was like mine, the side of your toenail growing in too far, you probably won't be able to do this.
Pain relievers are good to take too if you can't just lie on the couch all day.
Make sure that you always cut your toe nail straight across the top, curving it and cutting the corners can cause ingrown toenails. Make sure to tell the pedicurist to cut it straight if you get your toes done often.
Having a rounded toenail surface rather than flat also makes you more prone to get ingrown toenails so take extra care in looking after those toes!
I recently read the series "Tomorrow when the War Began" by John Marsden. I literally could not put the book down, it was so thought provoking and engaging.
The novel sets place in a fictional town known as Wirrawee, in Australia in the outback. The main character is 17 year old Ellie, who is a farm girl and knows about cattle, how to shoot a rifle and things like using a chainsaw. Ellie decides that instead of going to the yearly Wirrawee Show that her and her friends from school go camping out in the bush. She organises a group with her best friend Corrie, Corrie's boyfriend Kevin, Lee who is Vietnamese and works at his parents restaurant, Robyn the daughter of the church pastor, her neighbour and close friend Homer who is Greek-Australian and Fi who is the daughter of lawyers, and even though she doesn't know much about farming they ask her to come along.
The group of teenagers go out to the bush to camp (to me the landscape reminds me of the blue mountains) while they are in a place known as "Hell" cut off from the rest of civilisation, Ellie wakes up to notice fighter jets in the night sky. They aren't too worried, thinking that these jets are just the Australian Army planes.
However, once they return home to their parents places, they find that Australia has been invaded and the population has been imprisoned at the Wirrawee show ground.
The teenagers, soon have to fight for their survival and I did not find it farfetched at all. It makes you think about what is right and wrong, loyalty, friends, in a way the book kind of reminded me of the mateship that is outlined in Australian Army history, such as not leaving anyone behind. It's not all brave though and the characters have meltdowns and breakdowns, many people die and friends are lost. Being in the generation that I am in, it makes me actually think of the fact of the generations before who had to fight for their freedom and in turn guaranteed our freedom today, it puts in perspective of what our population would have to do to protect our country, friends and family, that if we lost our homes, freedom, how would we cope?
They have already made the movie for the first book, I enjoyed it even though it was a low budget. The books are great though. There are seven book in the series.
I went on a mini vacation to the gold coast and got very sunburnt by the pool, I've never really been sunburnt so I had to look for what works.
Sunburn cream: I tried this first, and it was nice and cold upon application but as my skin was so hot it started to heat up to which made my skin sting. I also had to use an entire bottle and it wasn't too soothing.
Spray for sunburn: The spray was a burns and antiseptic spray and it felt nice and icy cold from application but could only be applied every couple of hours, and after a while felt sticky and my skin felt stretched and sore.
Aloe vera: I got some aloe vera plant from my mum's garden and its so good, cold and soothing. This plant is also good for cuts, blisters and is usually in lotion, this plant is so handy to have in the garden. To apply the aloe vera you just snap it in half or peal the skin off.
Tomato: An old family friend who is literally like a grandmother to me, told me while we were having coffee that tomato rubbed on the burns will take the sting out of the skin. I went home and cut a tomato and applied it on my skin, seeds.
The best remedy in my opinion was the tomato and aloe vera applied one after the other. I then did some research on these remedies. Tomatoes contain an antioxidant called lycopene which research is beginning to show can protect the skin from UV damage and sunburn. I researched a bit of aloe vera and it was said to be used by the Ancient Romans and Greeks for wounds. I definitely know that these two worked on my sunburn better than any of the products from the chemist as I could apply them also as much as I preferred.
Oh and the best part is, that aloe vera and tomato are so cheap to use instead of buying products!
xox V
My opinion is to use the aloe vera plant from the garden and tomato for sunburn it worked so much better than the lotion and burns spray.
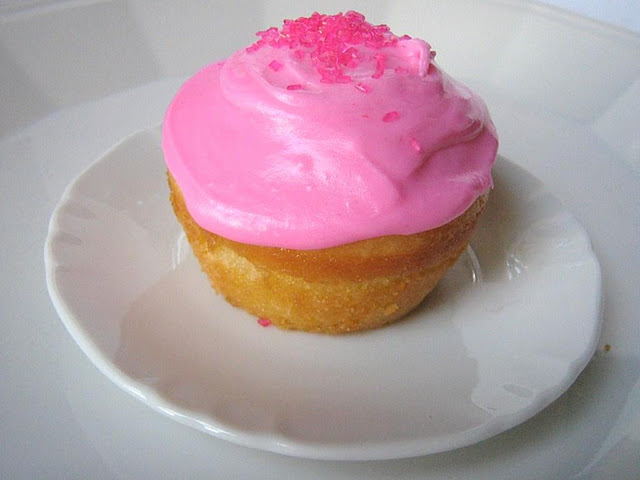
Delish! I made these two nights in a row now, and the disappear faster than you can say "CUPCAKES!" Everyone in the family loved them and couldn't but have two ;) What I like about these is that they are so amazingly simple but still satisfy that spot, especially when they are fresh out of the oven and warm. It's been so rainy and gloomy outside that warm soft cakes and treats are a necessity for the evenings inside. So here we go. Hope you enjoy them as much as my family did! (Unfortunately they went to fast to take pictures ;p)
Ingredients
1 stick of butter (or 4 ounces) (I used salted and just don't add extra salt to the recipe, if you have unsalted, go ahead and add a pinch of salt into the flour mixture)
1 cup of sugar
1/8 teaspoon of vanilla extract (just estimate, we love vanilla over here so I probably put in more like 1/4 teaspoon)
2 large eggs
1 1/2 cups all purpose flour
1 1/2 teaspoons baking powder
1/2 cup buttermilk
Preheat oven to 350F. Makes 12 cupcakes.
Preparation
1. I used my KitchenAid mixer with the paddle, it definitely makes it so much more light and fluffy. I recommend getting one if you think it is a worthy investment :)
2. Mix the butter and sugar together until creamy, add the vanilla extract and mix.
3. SIFT (don't skip sifting) the flour and baking powder together (and salt if you used unsalted butter). I just dump all of that into the sifter and sift it all at once...it will mix as it sifts! Give it a little stir after to make sure the baking powder is distributed evenly.
4. Add half the flour to the wet mixture, mix, add half the buttermilk and mix. Repeat for the rest, alternate flour and buttermilk.
5. Spoon into the cupcake cups and Ta Da! Into the oven it goes! How much easier could it possibly be!?
6. Bake for about 20 minutes. All ovens are different so as soon as the edges of the cupcake turns golden they're ready!
You can do anything with these cupcakes, add frosting, dust with icing sugar, fill the center with jam....There are endless possibilities.
Ok, I know it's already halfway through the first month of the new year, but hey, new year resolutions are important so I had to think about mine for a bit. I have never really laid down new year resolutions for myself in the past, they've always just floated around in my head as a possibility, an "I should try to do that" kind of a thing. And you can bet what happened...nothing. I wasn't sure I wanted to do them this year, it felt like too much commitment, why can't I just roll with the punches? But almost everyone makes resolutions. Why? Well here's what I think...
First of all, people like to have a goal, something positive to work towards. That's a great thing! Goals keep us motivated and on track and in control. The new year is a fresh start, when could be a better time to give your own life a face-lift? I also think a lot of it has to do with tradition and culture, and the fact that everyone does it. I realized a lot of my friends go to measures of writing down their resolutions and posting them on the refrigerator or bedroom door and yet the next day...they walk straight past it. Don't put in the effort of setting yearly goals if your not even going to take note of them.
I'm not sure if I like the idea. I'm all for improving lifestyle and making goals for yourself, don't get me wrong. I just feel that a lot it has become...commercialized. I'm a pretty spontaneous person, I like to adapt as I go, I see something I'd like to try, try it, drive by a girl running and say yeah I really should be doing that. lol
Maybe I don't like the idea of new year resolutions just because I don't trust myself to complete them considering I haven't in the past. I've also heard a lot of people saying that they don't like resolutions because they think they will disappoint themselves and others...if it leads to that misery, why even go down that road. The fact is that resolutions are pretty much personal, you make chose to share them, but when it comes down to it, they are for YOU. Who will care if you complete them or not? (Different story if you're doing them to impress) It's definitely not because I can't think of them...my life is far from perfect and could use a good lot of resolutions. Motivation? Well, depends for what. I guess that could be part of the problem. Have you noticed it's so much easier to work out when you have a buddy to help push you along? (where are you V when I need you? ;p)
Well here we go, I am going to document some of the things I'd LIKE to make my resolutions, but I'm not promising anything. (This post might be deleted in about a week if it ends up disastrous ;p).
1. Exercise every day of the week (weekends off). V, let's make a new schedule for ourselves (and post a workout play list on here!! <--genius idea ;P) 2. Start skating again...even just once a week! 3. Get into this program at the place I ride and get hired!! 4. Save money...my travelling will definitely be become less this year so hopefully this is a possibility. 5. Keep my room clean!! 6. Take time to pamper myself. 7. Become an expert cookie decorator! (and maybe start a site to sell them!) 8. Go visit V!! <3 9. Post on this blog at least twice a week. 10. Start working toward my future and a future with the boy and become more open with it to my family and his.
and lastly...
11. Continue working toward become an INDEPENDENT WOMAN.
Well, let's concentrate on ourselves this year ladies, let's make ourselves happy before anyone else. And if that includes moving forward with a special someone that's great. The important part is to base your decisions in life on your own happiness, don't try to please someone and make yourself miserable. It's a new year and fresh start. I can't wait to go on this journey with all of you. Cheers!
This is a post, that is personal yet I think it is really important to outline especially M & V is a blog about becoming and learning how to be an independent woman.
My parents split up and my mother and I moved when I was twelve, this was because my father was physically and verbally abusive, although he was only physically abusive to me not my mother. My mother was forced to leave, as if she didn't child services would have taken me away into foster care. Dealing with a parent who is physically and mentally abusive is very difficult, but like everything you can overcome anything you put your mind to.
Just before my 19th birthday I came back from Canada and my father had cancer, and I was asked to be his Power of Attorney, he said a lot of hurtful and nasty things to me during this time, even though I was there for him. I tried to be strong, and I was undertaking a full time dual degree at university in Business & Law and also working part time in a law firm.
The hardest thing for me, was talking to people I didn't tell anyone until he passed away the day before my 19th birthday, even my closest friends didn't know, I think it was because of my difficult past with him. Instead of dealing with these things I went to Canada to work in the ski fields and it was probably the best thing for me to do.
The thing is, I know it would have been easier for me if he was a different father figure in my life, and for a while after his death (I am now 21) I think i was mourning the father I never had.
Everyone deals differently with grief, I really struggled because of the hurt I went through in my life with him, but I mastered my courage finally and let go and scattered his ashes alone without anyone holding my hand, and I let go of my past while I did it, and I wasn't angry, or sad or resentful I just felt like I was accepting the past and accepting that he is my father, I do love him and he was good in other ways, there are just some things that no matter how much you analyse or think about you can never figure out. You just need to accept things, and move on.
It is hard, harder if you are mourning for a relationship you never had and never can have. What I learned was all I needed was time, take care of myself, the snowboarding helped, and I focussed on work and university. Really, you can overcome anything, you just have to be strong, resilient and you will have weak times, but in the end you just get a little bit stronger, and you will be so much stronger and happy, I know because I have been there. There are seven stages of grief:
Acceptance & Hope - you learn to accept and deal with the reality of the situation. This is where you will find a way forward. You look forward and plan things for the future, the wrenching pain will be gone. You will once again anticipate some good things to come. This is where I'm at now. :)
While I was staying at the hostel in downtown Vancouver I met a bunch of awesome Aussies and we ended up at Capilano Suspension Bridge.
Capilano Suspension Bridge is one of Vancouver's most popular tourist attractions. It is just minutes from the bustle of downtown Vancouver and offers a unique mix of adventure, history and culture.
The bridge is actually Vancouver's oldest tourist attraction, originally built in 1889 it is 137m and 70m above the Capilano River. Surrounding the bridge is a a twenty-seven acre park, with a Totem Park, Treetop walk and tours. The gift shop also has some great homemade fudge.
There are multiple reasons why you should seriously plan on skiing or snowboarding whistler mountain, one being the 8000 acres of skiable terrain, rising a mile above the valley of Whistler.
Here are some points of why it is such an amazing destination:
Greatest vertical, usable terrain for skiing and snowboarding in North America.
Consistently ranked in the top 5 for North American resorts selected by industry magazines.
Best parks and pipes in North America.
Largest above tree line terrain and bowls in North America.
Long ski season with skiing and riding into July.
Amazing BC apres ski and nightlife.
World class shopping and dining.
Glacier skiing - the only resort in North America where you can ski or ride on a glacier, right in the heart of the BC mountains.
I have travelled to Whistler on many occasions, it makes for a great day trip from Vancouver. It has a pretty Australian feel, and is known for the place to go during Australia day. There are many bars and a great night life.
I added a few photos of my former coworker and I at the top of blackcomb and a chopper we snowboarded past! ~ V
This is an extract from one of my travel journals while I was working in Canada at a ski field and the week I got back from Canada.
After finishing work at Grouse Mountain at 3pm our crew (known as work as A Crew) took two cars, a GPS, monster energy drinks and packed the car with snowboards and made the six hour trip to Big White, for an amazing two day road trip.
Big White Ski Resort, or Simply Big White, is a ski resort located 56 km southeast of Kelowna. It is the second largest resort in British Columbia after Whistler-Blackcomb and is the sister resort of Silver Star Mountain Resort. The resort is seriously recommended if your into knee deep POW POW and the tracks are some of 7km in length. Keep tabs on your buddies, because you will loose them sometimes in that big white fog.
There are some good bars, places to eat, night life and cheap ski in ski out hostels.
With this road trip, we found the road was quite dangerous, it was windy and there were a lot of semi trailers on the windy mountain highway.
Brisbane to Sydney
Brisbane to Sydney was another trip I made after getting back from Canada with a friend from university. It took us eleven hours straight, only stopping for petrol along the coastal road. We left on the Friday night and left Sydney on the Sunday morning to drive back to Brisbane for class on Monday. The trip definitely requires a lot of monster energy drinks, snacks and a good iPod playlist!
Also note, that if you are driving back to Brisbane through the night, keep an eye on the petrol gage! We realised on our way back that small country towns seem to close their petrol stations at night, we actually drove for 81km's with the fuel gage on empty. We actually pulled into a police station so they could direct us to the closest petrol station, so if this happens search for a police station where you could get help, especially safety is so important when its just you and one of your girlfriends travelling alone. I would also recommend taking more people for this trip so you can take it in turns to drive, and take rests as we didn't and we were exhausted in Sydney and after the drive back. ~ V
Okay, so writing about a beauty regime was M's idea....okay so here is mine. Italicized is M's.
I use proactive I don't use the three piece system I only use the face & body wash, its in a big bottle which lasts many months and I apply the proactive green tea moisturiser. That's all I use to cleanse, morning and night in the shower. It has this minty feel after or something, your skin feels so refreshed! I love this product! Been using it for three years now! I did use proactive also for a time, but it didn't help my skin much, dried it out in places and just didn't help the acne in others, everyone's skin type is different so experiment and see works best for you. I use Biore Pore Unclogging Scrub for my face in the shower each night (I found using it twice a day really dried out my skin). It definitely gives you that fresh minty feel and gently exfoliates. In the morning I do a light wash with a light facial soup and add moisturizer. ~M
I use the product "whiteglo for models", its so cheap its around $10 in the chemist and comes in a packet with the toothbrush and toothpaste. The toothbrushes are so soft, and amazing if you try them you'll know what I mean. I also don't drink coffee hardly ever, but if I eat or drink foods which can stain my teeth I always chew some "extra" gum so my teeth stay white.For our American readers, I've heard good things about Crest whitening treatments that you can get from your local pharmacy, although I haven't tried them myself. Unfortunately I use extra fluoride cavity protection toothpaste rather than whitening so I'm not an expert in that field either, since I have cavity prone teeth. If you are willing to spend the money, the whitening kits that your dentist put together for you work great...planning to have mine done as soon as I get my next appointment. ~M
I wear a retainer as I used to have braces, anyone who uses a retainer place your retainers in water with steradent tablets for dentures, they'll be brand new if you do this!
I never ever! Go to sleep with makeup on to avoid a breakout! I don't care how tired I am I will force myself to get up and wash my face! This also applies to brushing your teeth, don't make a habit, unless you don't want your teeth later in life!
I don't drink often. Drinking alcohol also can make you break out more, alcohol also has a lot of calories, and when your hungover the next day its hard to work it off when you're feeling sick. Try to limit your drinking, your liver, skin, complexion and wallet will be much happier!
I use a good body wash, at the moment I'm using pamolive shea butter, its better than cake soaps. Cake soaps make your skin feel dry and sticky. Also a massive pump bottle will last longer! I use Victoria's Secret's Seduction body wash, yes...oh la la, but it smells so lovely and fresh, rich at the same time! It's great, I have a problem with things drying out my skin but this has been great so far, smooth and silky! Shea butter is ALWAYS good though! ~M
I exfoliate! With a body scrub! YES! Also, before I put on lipstick when I wear it, i get a warm wash cloth (not the rough kind, like a small towel) and gently exfoliate my lips! I know, sounded strange to me at first also, but it helps get rid of those annoying bits of skin and makes your lips a lot smoother..especially for those of you that have bad habits of picking your lips (which you should stop right away!) or dry lips. Make sure you ALWAYS add a moisturizing balm before and after your lip color! ~M
I use the body shop's honey and oat face mask and the seaweed mask they have too. I don't use them often, just whenever I feel like giving my skin a treat and relaxing!
I try and drink at least 2L of water a day, I carry a 1L bottle around me all day, at work, at home, in my bedroom, its good to keep hydrated!I really need to do this, next thing on my shopping list...a pretty water bottle ;) ~M
Eat healthy food! You can't expect the exercise you've been doing to work if you haven't been eating the right food. Food and exercise go hand in hand. Grapes are supposed to help your skin! Fruits and veggies always good. It's hard, but I've heard eating red meat once a week is the best way to go! Still gives you the protein without to much excess calories. A balanced diet is the key!
Have sufficient sleep, it makes an amazing difference to your day!
Use sunscreen! Please don't fry your self in the sun with tanning oils, do it yourself spray tans are much safer. ~M
When I straighten or use heat near my hair I always use a heat protective spray in my hair. I used to use a leave in conditioner also, works too! But I do need to get a protective spray. ~M
To avoid frizzy hair, after shampooing, I ring the water out of my hair and apply conditioner and leave in for a few minutes before rinsing.YUP! ~M
Just another side note about what makeup I wear everyday. I NEVER use liquid foundation. I've tried lots, too cakey for me. I started using Victoria's Secret Tinted Moisturizer in light. Gave a great color and glow to my skin without feeling heavy. Doesn't give the coverage but definitely something I recommend. So much more airy and healthy for your skin. ~M
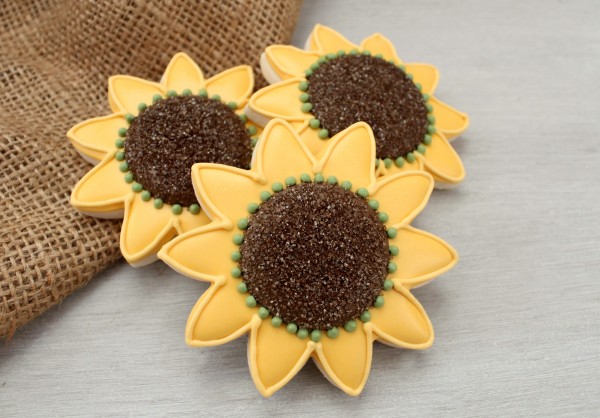
Yup! My new stress relieving hobby... Decorating sugar cookies (well technically you could decorate any kind of cookie but traditionally it's a delicious buttery cookie full of sugar). Over the past month or so I have collected over 150 cookie cutters and supplies such as piping icing tips, special icing coloring, sprinkles, and shimmer dusts. I love decorating the cookies. I never realized how much practice and skill it took.
Check out her blog, it's absolutely amazing, and she's one of my favorite cookie bloggers!
I hope I can decorate like her someday! It has been amazing how stress relieving this art is...and the tastiest form of art ever! I recommend you all to try it, start from the basics. The snowmen and snowflakes above were my second go at it and I've already learnt so much. I love the snowmen! Here are a couple of my favorite...
Cuties :) and definitely not perfect yet.
If any of interested HERE is the recipe I use for the sugar cookie again by the Sweet Sugar Belle.
And HERE is the recipe I use for the Royal Icing from Bake at 350 another amazing blog to visit! (There are lots of different kinds of icing...I like Royal Icing because it doesn't take away taste from the cookie...the focus is on the cookie not on the icing. If you wanted a more flavorful icing you might use Buttercream Icing.)
Enjoy the cookies, sometimes too pretty to eat! And perfect for homemade gifts for whatever occasion.
Don't like the lighting...ugh haha (first pics are much more realistic ;)


